
To continue my "Lunch Bag Specials" I will share here my basic "Finger Salad" preparation. I call them "Finger Salads" because...everything can be eaten with your fingers...(!). If you really want to have something to dip these vegetables into, that's fine. Try to make sure it doesn't have any high fructose corn syrup or monosodium glutamate in it. I have come to prefer these vegetables plain myself, so that is the way I eat them. Besides, including dip means making room for it in what will already be a Very Full lunch bag by the time I'm finished!
To start you'll need some plastic containers. At home or on the road I usually plan to pack around five or six at a time (however, I will only be showing three in these pictures).
 I line the bottoms of the containers with light-weight, washable, cotton cloths (instead of disposable paper towels) that I have dampened with water. These I made and hemmed with my serger.
After getting the containers ready, it is time to add the Romaine lettuce. I am in the habit of chopping ends off of vegetables in multiple cuts so that the pieces are already small enough to go into the compost.


Once you have your lettuce trimmed, washed, and drained you can fit it into the plastic storage containers, breaking off more of the ends as necessary and "snacking" on those while you're at it. (This will ultimately provide you with your sixth finger salad for your prep day. : ))


Whatever lettuce is left over, I like to store it in a damp cotton bag first and then put that into another plastic bag, preferably the kind that does NOT "breath" as much, because they tend to dry-out the cotton bag, and therefore the lettuce, much more quickly. If the bag is too wet, i.e. dripping, I just take it outside for a little spin...and that takes care of that. : )


Otherwise, I have learned, again, from years of experience, that having that damp cotton bag in between the lettuce and the plastic bag allows the air around the lettuce to remain humid but Not wet. Wet lettuce against plastic = rotten lettuce. Simple as that. I used to get whole cases of romaine lettuce a long time ago and I would prep all the heads this way prior to storing them and I would have lettuce in good condition for a month or longer. (And, by the way, if you can't find these cotton bags or don't want to go to the trouble of making them yourself, let me know, because I have some home-made ones for sale...surprise, surprise. : ))
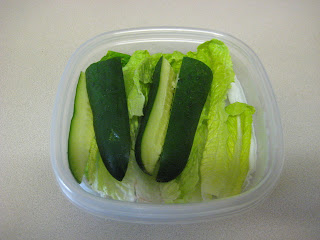
After lining the containers with lettuce, it is time for the other vegetables. I really love the Trader Joe's Persian Cucumbers, partly because they are just the right size to fit one per container and, because you don't have to slice them, they stay fresher longer. However, taking a larger conventional cucumber and slicing it into spears will also work, or cutting a hot house cucumber in pieces as well. All the cucumbers should be thoroughly washed. I like to use Dr. Bronner's Peppermint soap myself. And, as with the lettuce, anything that is "left-over" or doesn't fit into the containers can be "snack food" for your prep day.

The main thing with using sliced cucumbers is the more you slice, the faster they will start to decay. I'm sure fresh cucumbers out of the garden will last better, but with conventional, store-bought cucumbers, you'll really need to be finishing them within a week, and you may even want to cut them and add them as part of your morning lunch prep.
So now we have our lettuce and cucumbers. Next up is tomatoes.


I usually use grape or cherry tomatoes. Again, I rinse them and then...I...count them, so I know how many I have to go into each container, and...you guessed it...any odd ones are snacks while I'm prepping.
So the last thing I will include in my finger salads is celery.


Basically the same prep as lettuce, chopping the ends, removing the leaves, and rinsing the stalks before cutting them into short enough pieces to fit into the containers. Little bits of celery heart, any sticks that won't fit into the containers...snack food.


There! Aren't they Beautiful?! : )
Lids on, containers go into the refrigerator, and you have a really healthy compliment of vegetables ready to go for the next week of lunches.
No comments:
Post a Comment